Introduction
3D printing has changed the way products are designed and manufactured. From prototypes to final products, designers can create complex shapes quickly and efficiently. However, successful printing requires careful planning. Good design practices help avoid print failures, improve strength, and reduce material waste.
Understanding essential 3d printing design tips can make a huge difference in the final result. Whether you are a beginner or an experienced designer, small adjustments in design can improve quality and reliability. In addition, better design decisions reduce printing time and production costs.
Understanding the Basics of 3D Printing Design
Before starting a design, it is important to understand how 3D printing works. Unlike traditional manufacturing, 3D printing builds objects layer by layer. This layered process affects strength, surface finish, and print accuracy.
Because of this, designers must consider layer direction, material behaviour, and support requirements. Ignoring these factors can cause weak parts or failed prints.
Applying the right 3d printing design tips early in the design stage saves time and prevents repeated adjustments later.
Know Your Printing Technology
Different printers use different technologies. FDM, SLA, and SLS printers behave differently when printing parts.
For example, FDM printers often need support structures for overhangs. SLA printers provide high detail but require careful orientation. Understanding your printer’s capabilities helps you design parts that match the technology.
Understand Material Behaviour
Each printing material has unique properties. PLA is easy to print but may be less durable. ABS is stronger but more sensitive to temperature.
Therefore, choosing the right material is one of the most important 3d printing design tips for achieving strong and functional parts.
Design with Proper Wall Thickness
Wall thickness directly affects the strength and stability of a printed object. If walls are too thin, the object may break during printing or use.
A good rule is to design walls that match the printer’s nozzle size and layer width. For many FDM printers, walls between 1.2 mm and 2 mm work well.
Consistent wall thickness improves structural integrity and ensures smoother printing.
Avoid Extremely Thin Features
Thin edges, spikes, or tiny structures often fail during printing. They may also break easily after printing.
When designing complex parts, slightly increasing thickness improves durability without affecting appearance.
Optimise Overhangs and Angles
Overhangs are areas where layers extend beyond the previous layer. Most printers struggle with extreme overhangs.
One of the most important 3d printing design tips is keeping overhang angles below 45 degrees whenever possible. This allows the printer to build layers without requiring extra supports.
Use Angled Surfaces Instead of Flat Overhangs
Instead of designing flat horizontal extensions, use gentle slopes or chamfers. Angled designs print more easily and reduce the need for supports.
This approach improves surface finish and reduces post-processing work.
Reduce the Need for Support Structures
Support structures help print complex designs, but they increase material use and printing time. Removing supports may also damage delicate surfaces.
Designers should minimise supports whenever possible.
One practical way to achieve this is by splitting large designs into smaller parts. These parts can be printed separately and assembled later.
Another option is redesigning shapes so that all surfaces remain self-supporting.
For packaging prototypes or presentation models, companies sometimes use customised design elements such as Custom Packaging fromto enhance branding while maintaining a print-friendly design.
Design for Print Orientation
Print orientation plays a major role in part strength. Because 3D printing builds objects layer by layer, parts are weaker between layers than within layers.
Therefore, designers must orient parts so that the strongest direction matches the load direction.
Align Strength with Layer Direction
If a part experiences tension or bending, the layers should run across the load rather than along it. This reduces the chance of layer separation.
Correct orientation is one of the most practical 3d printing design tips for improving durability.
Improve Surface Quality
Orientation also affects visual quality. Surfaces printed on the build plate usually appear smoother than vertical surfaces.
Adjusting orientation helps improve the final appearance of the printed object.
Allow Proper Tolerances for Moving Parts
Many 3D printed designs include joints, hinges, or sliding components. Without correct tolerances, these parts may fuse together during printing.
A small gap between moving parts allows them to function properly.
In most FDM prints, gaps between 0.3 mm and 0.5 mm work well for mechanical movement.
Testing tolerances with small prototypes before final production is always recommended.
Avoid Large Flat Surfaces
Large flat surfaces may warp during printing, especially with materials like ABS.
Warping occurs when layers cool and shrink unevenly. This can cause corners to lift from the print bed.
Use Fillets and Curves
Adding small curves or fillets helps distribute stress more evenly. This reduces warping and improves structural strength.
Curved designs also look more professional and modern.
Use Hollow Designs to Save Material
Solid prints consume more material and increase printing time. In many cases, fully solid parts are unnecessary.
Instead, designers should use internal infill structures. These structures maintain strength while reducing material use.
Most slicing software allows infill between 10% and 40%, depending on strength requirements.
This method is one of the most efficient 3d printing design tips for reducing costs.
Test Prototypes Before Final Production
Even experienced designers test their models before final printing. Small prototypes reveal design issues early.
For example, testing may show weak areas, incorrect tolerances, or surface problems.
Making adjustments at this stage saves both time and materials.
Many industry experts share helpful print & finishing insights on platforms like , which can guide designers in improving print quality and finishing techniques.
Consider Post-Processing During Design
Post-processing includes sanding, painting, polishing, or assembly. Good design anticipates these steps.
For example, designers may add extra material for sanding or create alignment guides for assembly.
Thinking ahead about finishing steps leads to better final products.
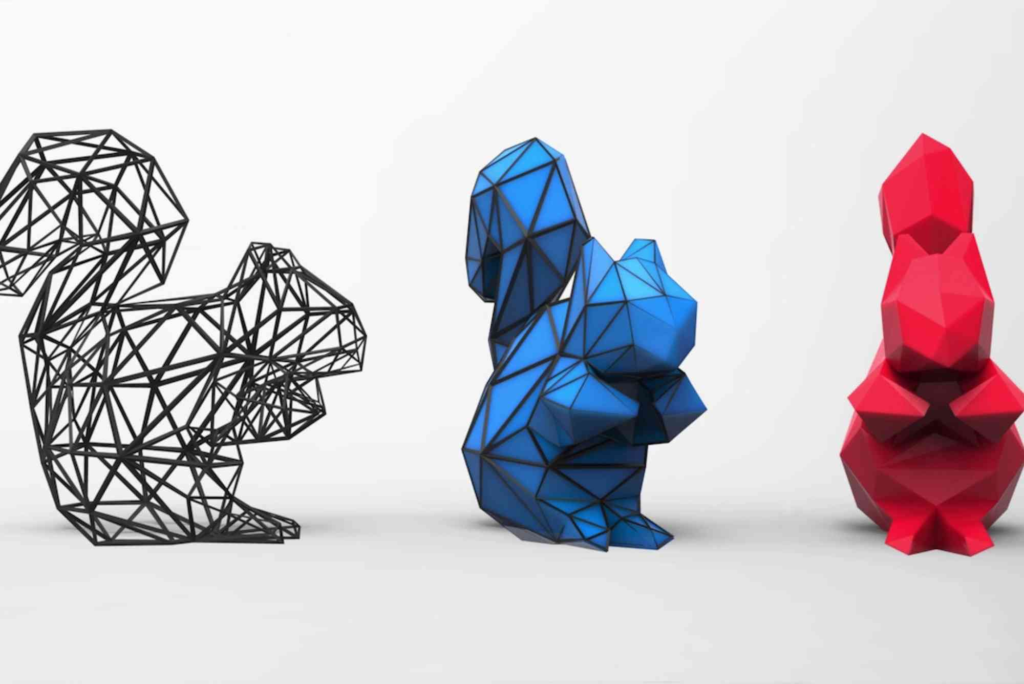
Use Simple Geometry When Possible
Complex geometry increases printing time and the chance of failure.
While 3D printing allows complex shapes, simplicity often improves reliability.
Designers should remove unnecessary details and focus on functional features.
Clean geometry also makes models easier to modify and scale.
Maintain Balanced Weight Distribution
Uneven weight distribution can cause instability during printing.
Tall objects with narrow bases may wobble or detach from the build plate.
To prevent this, designers should create wider bases or use additional supports at the bottom.
Balanced designs improve both print stability and final product durability.
Design for Assembly
Large objects often exceed printer size limits. Instead of scaling down the design, break it into smaller sections.
These sections can be assembled using clips, screws, or snap-fit connections.
Designing for assembly also allows easier transportation and maintenance.
Plan for Branding and Presentation
Many businesses use 3D printing for product prototypes, packaging concepts, and promotional displays.
When presentation matters, designers should plan areas for branding, logos, or labels.
Companies working on packaging projects sometimes review Buddy Packaging Location to explore packaging solutions that complement printed prototypes and retail displays.
Combining thoughtful design with professional presentation strengthens the final product.
Conclusion
3D printing offers incredible freedom for designers, but success depends on smart design choices. Understanding materials, printer limitations, and structural requirements helps create reliable and high-quality prints.
By applying these practical 3d printing design tips, designers can reduce print failures, improve durability, and optimise material usage. Small improvements in wall thickness, orientation, and tolerances often produce significant results.
Whether you are designing prototypes, mechanical parts, or presentation models, thoughtful planning always leads to better outcomes.
If you want to achieve professional results, start applying these 3d printing design tips in your next project. Testing, refining, and learning from each print will quickly improve your design skills and printing success.
Exploring fun and simple craft ideas can inspire creativity for both children and adults. One enjoyable method is potato printing, which allows you to create unique patterns and artwork using basic materials at home. If you want inspiration and step-by-step ideas, check out these creative potato printing designs to start making colourful and imaginative prints easily.
FAQs
What are the most important 3d printing design tips for beginners?
Beginners should focus on proper wall thickness, avoiding extreme overhangs, and designing with correct tolerances. These basics reduce print failures.
What is the best wall thickness for 3D printing?
For most FDM printers, wall thickness between 1.2 mm and 2 mm provides good strength and print reliability.
How do you reduce support structures in 3D printing?
Design angled surfaces, split models into parts, and avoid flat overhangs. These techniques reduce the need for supports.
Why does print orientation matter in 3D printing?
Print orientation affects both strength and surface quality. Correct orientation improves durability and appearance.
How can I make my 3D prints stronger?
Increase wall thickness, adjust infill percentage, and align layer direction with the load direction.
What is the ideal tolerance for moving parts in 3D printing?
Most FDM designs require gaps between 0.3 mm and 0.5 mm to ensure moving parts do not fuse together during printing.